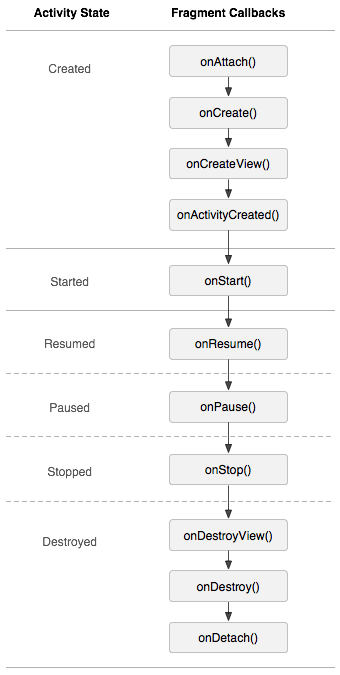
Fragment的生命周期
Fragment比Activity多了几个额外的生命周期回调方法:
onAttach(Activity): 当Fragment与Activity发生关联时调用
onCreate(): 初始创建Fragment对象时调用
onCreateView(LayoutInflater,ViewGroup,Bundle) : 创建Fragment的视图
onActivityCreated(Bundle) :当Activity的onCreate方法返回时调用
onStart()
onResume()
onPause()
onStop()
onDestoryView() : 与onCreateView相对应,当该Fragment的视图被移除时调用
onDestory()
onDetach() : 与onAttach相对应,当该Fragment与Activity关联被取消时候调用
注意 :除了onCreateView,其他的所有方法被重写的时候必须调用父类对于该方法的实现,即super.onXxx()。
静态的使用Fragment 把Fragment当成普通的控件使用,直接写在Activity的布局文件中。 步骤:
举例:Fragment class 文件:
1
2
3
4
5
6
7
8
9
10
11
12
13
14
15
16
17
18
19
20
21
22
23
24
25
26
27
28
29
public class Content2Fragment extends Fragment { public Content2Fragment () { } @Override public void onCreate (Bundle savedInstanceState) { super .onCreate(savedInstanceState); } @Override public View onCreateView (LayoutInflater inflater, ViewGroup container, Bundle savedInstanceState) { return inflater.inflate(R.layout.fragment_content2, container, false ); } }
Fragment layout 文件:
1
2
3
4
5
6
7
8
9
10
11
12
13
14
15
16
17
18
19
20
21
22
23
24
25
<FrameLayout xmlns:android="http://schemas.android.com/apk/res/android" xmlns:tools="http://schemas.android.com/tools" android:layout_width="match_parent" android:layout_height="match_parent" android:background="#71a05bc4" tools:context="com.chenley.an.yutownhelper.fragment.Content2Fragment" > <TextView android:layout_width="match_parent" android:layout_height="match_parent" android:gravity="center" android:text="这是内容2的Fragment" /> </FrameLayout>
Activity class 文件:
1
2
3
4
5
6
7
8
9
10
11
12
13
14
15
16
17
public class FragmentTestActivity extends AppCompatActivity { private static final String TAG = "FragmentTestActivity`==" ; @Override protected void onCreate (Bundle savedInstanceState) { super .onCreate(savedInstanceState); setContentView(R.layout.activity_fragment_test); } }
Activity layout 文件:
1
2
3
4
5
6
7
8
9
10
11
12
13
14
15
16
17
18
19
20
21
22
23
24
25
<RelativeLayout xmlns:android="http://schemas.android.com/apk/res/android" xmlns:tools="http://schemas.android.com/tools" android:layout_width="match_parent" android:layout_height="match_parent" > <fragment android:id="@+id/id_fragment_content2" android:name="com.chenley.an.yutownhelper.fragment.Content2Fragment" android:layout_width="match_parent" android:layout_height="match_parent" tools:layout="@layout/fragment_content2" /> </RelativeLayout> 这里注意:需要添加tools,才能在AS中渲染
动态使用Fragment 动态的添加、更新、以及删除Fragment:
MainActivity class 文件:
1
2
3
4
5
6
7
8
9
10
11
12
13
14
15
16
17
18
19
20
21
22
23
24
25
26
27
28
29
30
31
32
33
34
35
36
37
38
39
40
41
42
43
44
45
46
47
48
49
50
51
52
53
54
55
56
57
58
59
60
61
62
63
64
65
66
67
68
69
70
71
72
73
74
75
76
77
78
79
80
81
82
83
84
85
86
87
88
89
90
91
92
93
94
95
96
97
98
99
100
101
102
103
104
105
106
107
108
109
110
111
112
113
114
115
116
117
118
119
120
121
122
123
124
125
126
127
128
129
130
131
132
133
134
135
136
137
138
139
140
141
142
143
144
145
146
147
148
149
150
151
152
153
public class FragmentTestActivity extends AppCompatActivity implements TitleFragment .OnFragmentInteractionListener, ContentFragment.OnFragmentInteractionListener { private static final String TAG = "FragmentTestActivity==" ; @Bind(R.id.btn1) Button btn1; @Bind(R.id.btn2) Button btn2; @Bind(R.id.btn3) Button btn3; @Bind(R.id.btn4) Button btn4; @Bind(R.id.id_content) FrameLayout idContent; private Fragment mTitleFragment; private Fragment mContentFragment; private Fragment mContent2Fragment; private Fragment mContent3Fragment; private Fragment mContent4Fragment; @Override protected void onCreate (Bundle savedInstanceState) { super .onCreate(savedInstanceState); requestWindowFeature(Window.FEATURE_NO_TITLE); setContentView(R.layout.activity_fragment_test); ButterKnife.bind(this ); Log.d(TAG, "onCreate() called with: " + "savedInstanceState = [" + savedInstanceState + "]" ); setDefaultFragment(); } private void setDefaultFragment () { FragmentManager fm = getSupportFragmentManager(); FragmentTransaction ft = fm.beginTransaction(); mTitleFragment = new TitleFragment (); mContentFragment= new Content `Fragment(); mContent2Fragment = new Content2Fragment (); ft.replace(R.id.id_content, mContent2Fragment); ft.commit(); } @Override public void onFragmentInteraction (Uri uri) { Log.d(TAG, "onFragmentInteraction() called with: " + "uri = [" + uri + "]" ); } @OnClick({R.id.btn1, R.id.btn2, R.id.btn3, R.id.btn4}) public void onClick (View view) { FragmentManager fm = getSupportFragmentManager(); FragmentTransaction ft = fm.beginTransaction(); switch (view.getId()) { case R.id.btn1: if (mContentFragment == null ) { mContentFragment = ContentFragment.newInstance(null , null ); } ft.replace(R.id.id_content, mContentFragment); break ; case R.id.btn2: if (mContent2Fragment == null ) { mContent2Fragment = Content2Fragment.newInstance(null , null ); } ft.replace(R.id.id_content, mContent2Fragment); break ; case R.id.btn3: if (mContent3Fragment == null ) { mContent3Fragment = Content3Fragment.newInstance(null , null ); } ft.replace(R.id.id_content, mContent3Fragment); break ; case R.id.btn4: if (mContent4Fragment == null ) { mContent4Fragment = Content4Fragment.newInstance(null , null ); } ft.replace(R.id.id_content, mContent4Fragment); break ; } ft.commit(); } }
MainActivity layout 文件:
1
2
3
4
5
6
7
8
9
10
11
12
13
14
15
16
17
18
19
20
21
22
23
24
25
26
27
28
29
30
31
32
33
34
35
36
37
38
39
40
41
42
43
44
45
46
47
<RelativeLayout xmlns:android="http://schemas.android.com/apk/res/android" xmlns:tools="http://schemas.android.com/tools" android:layout_width="match_parent" android:layout_height="match_parent" > <fragment android:id="@+id/id_fragment_title" android:name="com.chenley.an.yutownhelper.fragment.TitleFragment" android:layout_width="fill_parent" android:layout_height="45dp" tools:layout="@layout/fragment_title" /> <FrameLayout android:id="@+id/id_content" android:layout_width="match_parent" android:layout_height="match_parent" android:layout_below="@id/id_fragment_title" android:background="#337e7871" /> <include android:id="@+id/id_ly_bottombar" layout="@layout/bottombar" android:layout_width="match_parent" android:layout_height="55dp" android:layout_alignParentBottom="true" /> </RelativeLayout>
注意 :注:如果使用Android3.0以下的版本,需要引入 v4 的包,然后Activity继承FragmentActivity,然后通过getSupportFragmentManager获得FragmentManager。
如图:
Fragment 常用 API:
android.app.Fragment 主要用于定义Fragment;
android.app.FragmentManager 主要用于在Activity中操作Fragment;
android.app.FragmentTransaction 保证一些列Fragment操作的原子性;
transaction.add()//往Activity中添加一个Fragment
transaction.remove() //从Activity中移除一个Fragment,如果被移除的Fragment没有添加到回退栈(回退栈后面会详细说),这个Fragment实例将会被销毁。
transaction.replace() //使用另一个Fragment替换当前的,实际上就是remove()然后add()的合体`
transaction.hide() //隐藏当前的Fragment,仅仅是设为不可见,并不会销毁
transaction.show() //显示之前隐藏的Fragment
detach() //会将 view 从 UI 中移除,和remove()不同,此时 fragment 的状态依然由FragmentManager维护。
attach() //重建 view 视图,附加到 UI 上并显示。
transatcion.commit() //提交一个事务
注意:遇到这样Activity状态不一致:State loss这样的错误。主要是因为:commit()方法一定要在Activity.onSaveInstance()之前调用。
Api 使用场景举例
比如:我在FragmentA 中的EditText填了一些数据,当切换到FragmentB 时,如果希望回到 A 中的时候还能继续看到数据,那么就应该使用hide()/show(),也就是说,希望保留用户的操作界面数据,那么就使用hide()、show()方法,这个时候在newInstance的时候需要做非空判断;
如果我们不希望保留用户的操作界面数据,那么可以使用remove()+add(),或者使用 replace()也可以达到同样的效果;
remove()和detach()的一点区别:在不考虑回退栈的情况下,remove()会销毁整个 Fragemnt 实例,而detach()只会销毁其视图结构,即调用ondestoryVeiw(),而不会销毁Fragment的实例;如果你的当前Activity一直存在,那么在不希望保留用户操作的时候,你可以优先使用 detach。
如何管理Fragment的回退栈 类似与 Android 系统为Activity维护一个任务栈,我们也可以通过Activity维护一个回退栈来保存每次Fragment实例发生的变化。如果你将Fragment任务添加到回退栈,当用户点击后退按钮时,将看到上一次的保存的Fragment。一旦 Fragemnt 完全从后退栈中退出,用户再次点击后退键,则退出当前Activity。如下图所示
点击第一个按钮,切换到第二个界面,点击第二个按钮,切换到第三个界面,然后点击 Back 键依次回退。这里是Fragment实现的,用户点击 Back,实际是Fragment回退栈不断的出栈。
添加一个Fragment事务到回退栈:FragmentTransaction.AddToBackStack(String)
注意:使用replace or hide/show的方式 添加回退栈,点击回退键后有不同的效果,前者显示空白状态(视图结构被销毁,实例未被销毁),否者可以正常显示跳转前的内容;
Fragment 和 Activity 的通信:
如果你Activity中包含自己管理的Fragment的引用,可以通过引用直接访问所有的Fragment的public方法;
如果Activity中未保存任何Fragment的引用,那么可以通过getFragmentManager.findFragmentByTag()或者findeFragmentById()获取任何的Fragment实例,然后进行操作。
在Fragment中可以通过getActivity()得到当前绑定的Activity的实例,然后进行操作。
注意:如果在Fragment中需要 Context,可以通过getActivity(),如果Context需要在Activity被销毁后还存在,则使用getActivity().getApplicationContext().
Fragment类的带生命周期模板:1 2 3 4 5 6 7 8 9 10 11 12 13 14 15 16 17 18 19 20 21 22 23 24 25 26 27 28 29 30 31 32 33 34 35 36 37 38 39 40 41 42 43 44 45 46 47 48 49 50 51 52 53 54 55 56 57 58 59 60 61 62 63 64 65 66 67 68 69 70 71 72 73 74 75 76 77 78 79 80 81 82 83 84 85 86 87 88 89 90 91 92 93 94 95 96 97 98 99 100 101 102 103 104 105 106 107 108 109 110 111 112 113 114 115 116 117 118 119 120 121 122 123 124 125 126 127 128 129 130 131 132 133 134 135 136 137 138 139 140 141 142 143 144 145 146 147 148 149 150 151 152 153 154 155 156 157 158 159 160 161 162 163 164 165 166 167 168 169 170 171 172 173 174 175 176 177 178 179 180 181 182 183 184 185 186 187 188 189 190 191 192 193 194 195 196 197 198 199 200 201 public class ModelFragment extends Fragment { private static final String TAG = "ModelFragment==" ; public static final String PARAM1 = "param1" ; public static final String PARAM2 = "param2" ; private String mParam1; private String mParam2; @Override public void onAttach (Context context) { super .onAttach(context); if (context instanceof OnFragmentInteractionListener) { onFragmentInteractionListenr = (OnFragmentInteractionListener) context; } else { throw new RuntimeException (context.toString() + "must implements On`Fragment`InteractionListener" ); } Log.d(TAG, "onAttach() called with: " + "context = [" + context + "]" ); } @Override public void onCreate (@Nullable Bundle savedInstanceState) { super .onCreate(savedInstanceState); if (getArguments() != null ) { mParam1 = getArguments().getString(PARAM1); mParam2 = getArguments().getString(PARAM2); } } @Nullable @Override public View onCreateView (LayoutInflater inflater, @Nullable ViewGroup container, @Nullable Bundle savedInstanceState) { View view = inflater.inflate(R.layout.fragment_content, container, false ); return view; } @Override public void onActivityCreated (@Nullable Bundle savedInstanceState) { super .onActivityCreated(savedInstanceState); Log.d(TAG, "on`Activity`Created() called with: " + "savedInstanceState = [" + savedInstanceState + "]" ); } @Override public void onStart () { super .onStart(); Log.d(TAG, "onStart() called with: " + "" ); } @Override public void onResume () { super .onResume(); Log.d(TAG, "onResume() called with: " + "" ); } @Override public void onPause () { super .onPause(); Log.d(TAG, "onPause() called with: " + "" ); } @Override public void onDestroyView () { super .onDestroyView(); Log.d(TAG, "onDestroyView() called with: " + "" ); } @Override public void onDestroy () { super .onDestroy(); Log.d(TAG, "onDestroy() called with: " + "" ); } @Override public void onDetach () { super .onDetach(); onFragmentInteractionListenr = null ; Log.d(TAG, "onDetach() called with: " + "" ); } public ModelFragment () } public static ModelFragment newInstance (String param1, String param2) { ModelFragment modelFragment = new ModelFragment (); Bundle bundle = new Bundle (); bundle.putString(PARAM1, param1); bundle.putString(PARAM2, param2); modelFragment.setArguments(bundle); return modelFragment; } public interface OnFragmentInteractionListener { void onFragmentInteraction (Uri uri) ; } private OnFragmentInteractionListener onFragmentInteractionListenr; public void setOnFragmentInteractionLister (OnFragmentInteractionListener on`FragmentInteractionListenr) { this .onFragmentInteractionListenr = onFragmentInteractionListenr; } public void onEventAction (Uri uri) { if (onFragmentInteractionListenr != null ) { onFragmentInteractionListenr.onFragmentInteraction(uri); } } }
参考资源